Enabling Hibernation on Ubuntu 24.04 with Full-Disk Encryption using the TPM
I went through about 5 titles, and it’s still way too damn wordy.
It’s not too difficult to use FDE with the TPM and Secure Boot on Ubuntu 24.04 (the installer supports this configuration, though doesn’t make it easy to figure out what the prerequisites are), but what if you want hibernation support? The kernel hard-disables hibernation when Secure Boot is enabled, so you obviously can’t have all four at once… But you can have either of those with both of the others, and switch between them at will. This even includes having the hibernate image in encrypted swap. This took me a couple of days of fighting with multiple distros to try to get what I wanted (including several hours just trying to get Arch to boot), and I finally figured it out with Ubuntu 24.04.
There are obviously security implications, but this satisfies my threat and convenience levels. Your mileage may vary.
This is a long post because it is a step-by-step guide. If you’re not here trying to do this for yourself, please skip this. I don’t want to waste your time.
Security
So, first and foremost: the security compromises. I am not a security expert, this is my own reasoning, this is not professional advice, evaluate your own personal threat assessment to make an informed decision, and please do not argue with me about my decisions (but if you are a security professional, I am very much open to civil feedback).
Obviously, not having Secure Boot enabled can cause some issues, especially with an unencrypted /boot partition.
However, I’ve mitigated those concerns for my threat level with the TPM PCRs that I’m using:
- 0: System firmware executable code (so
fwupdcould cause TPM failures) - 1: System configuration
- 4: Firmware boot order (so booting an external disk won’t allow unlocking with the TPM)
- 5: Boot configuration, including GPT
- 7: Secure Boot state (on/off)
- 8: Kernel command line (so editing the boot list in GRUB won’t allow unlocking with the TPM)
- 9: Kernel boot state including initrd contents and kernel itself (so system updates could cause TPM failures)
Further reference is available on the Arch wiki.
Basically, this means that the computer will only automatically unlock the drive if nothing in the boot path has changed,
so it should be Safe Enough™.
If you’re careful enough to only type the unlock password on boot when you’re expecting to need to
(e.g. you just updated the kernel), it should be reasonably secure.
Even an attempt to inject something into the initramfs (on the unencrypted /boot partition)
would be foiled by PCR 9 detecting that it has changed (short of finding a hash collision).
Notes
- I am assuming that you are installing onto
/dev/nvme0n1. Substitute appropriately if required (e.g./dev/sda). - I use KDE. I don’t know how to get hibernate to show up in other desktop environments, if it doesn’t show up by default.
Installation
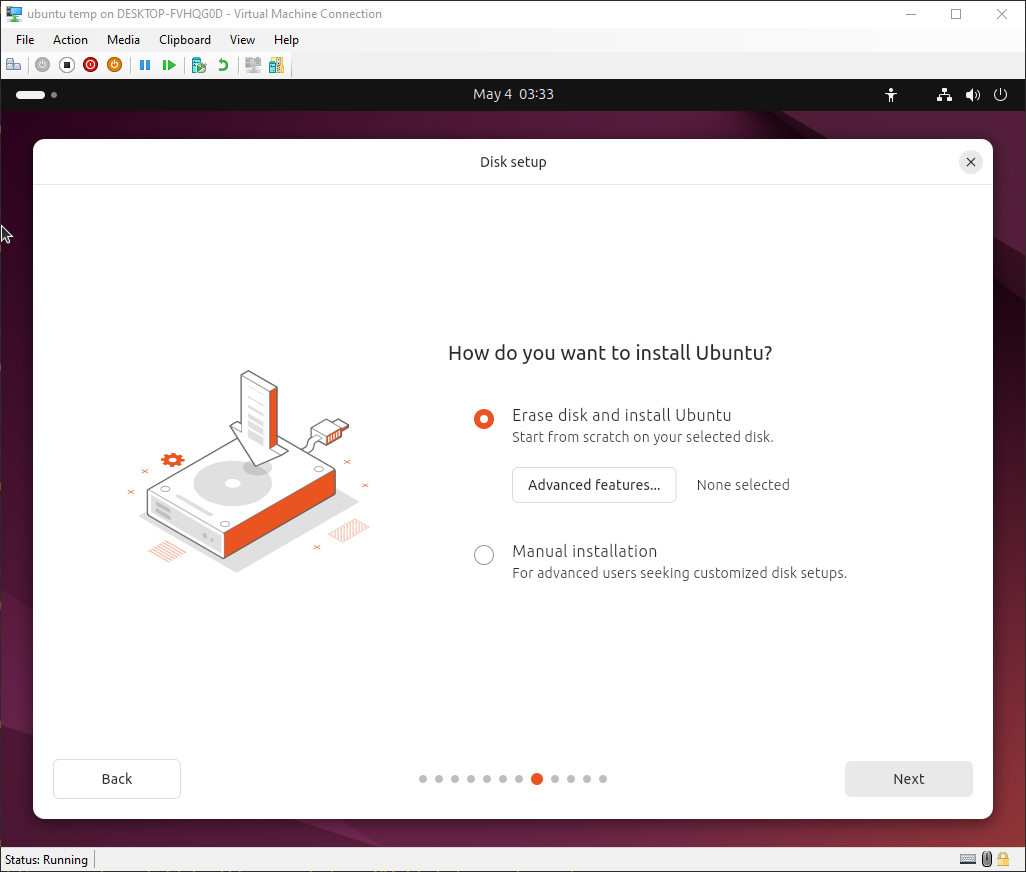
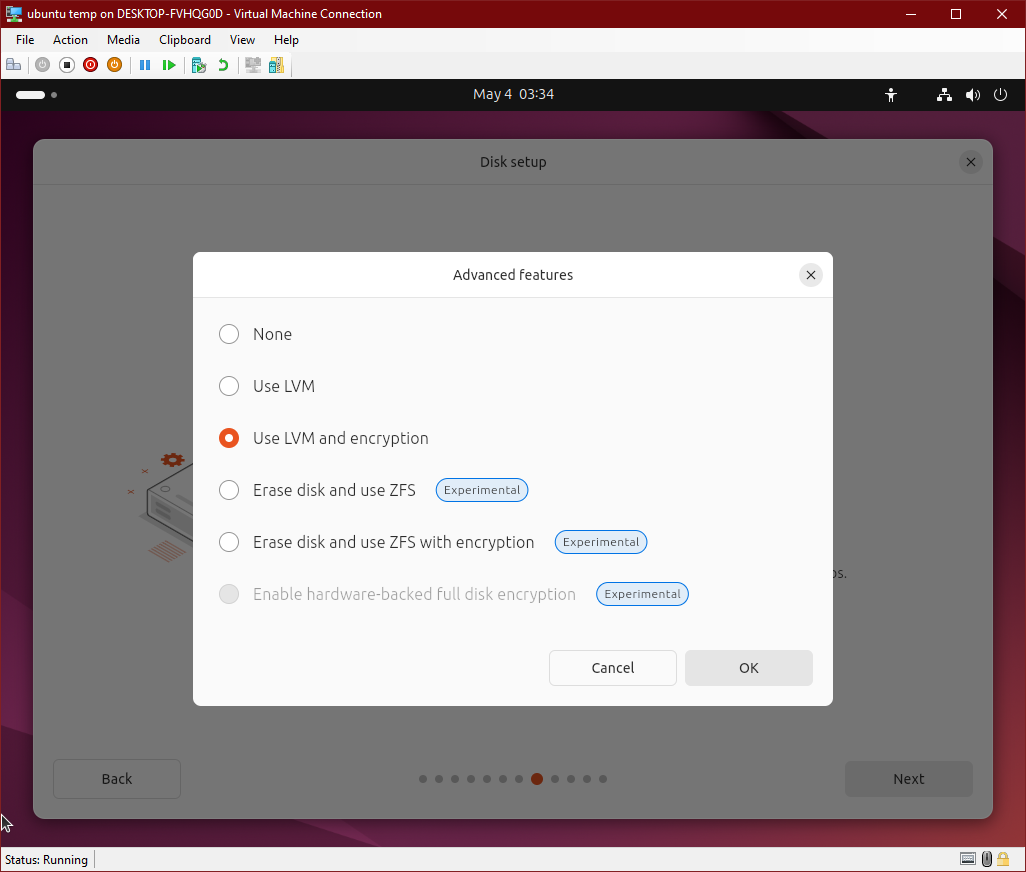
Install Ubuntu 24.04 with the full-disk encryption option, but not the TPM option. The other options shouldn’t matter since we’re not using the built-in TPM support or Secure Boot. We do not want to use the “manual partitioning” option in the installer, because it is incredibly limited in what it can do. You might be able to manually configure the disk how you want via a terminal, and then map it in the installer, but I’ve found it’s easier to just let it do what it wants to do then go fix it later, so use the “Erase disk and install Ubuntu” option, and click on “Advanced features…”. Enable the “Use LVM and encryption option” and hit OK. Use whatever passphrase you’d like for the disk. You will need to type it once in a while (mainly after kernel updates).
(Do not judge me for using Hyper-V to obtain these screenshots.)
Do whatever you want for everything else in the installer, it doesn’t really matter. We’re going to adjust the disk layout a bit when it’s done anyway (it uses a swap file but hibernate is a lot easier with a swap partition).
Mess with the disk
Once the installer is completed, boot it up to make sure it’s working (using the password you just set for the disk),
and then boot back into the installer again (we need to do these steps with the filesystem unmounted).
Close the actual installer when it pops up, and open a terminal.
We’re going to shrink the / filesystem, resize its LVM volume,
expand the filesystem back to the full size of its volume,
and then add a new (encrypted) logical volume for swap.
First, we have to unlock the encrypted disk: sudo cryptsetup luksOpen /dev/nvme0n1p3 dm_crypt-0
It’s important to use dm_crypt-0 as the name in case you ever need to rescue the system.
That’s the name Ubuntu uses, so if you don’t use it here,
stuff won’t work right if you use a chroot to try to fix boot issues.
Now, let’s make sure that the volume is detected: sudo lvscan
It should show an ACTIVE /dev/ubuntu-vg/ubuntu-lv. That’s our /.
We want to shrink that so that we can add some swap after it.
However, first we must fsck it (or resize2fs will just tell us to do it):
sudo e2fsck -f /dev/mapper/ubuntu--vg-ubuntu--lv
Now, we can actually resize it (the -M means to shrink it to the smallest possible size):
sudo resize2fs -M /dev/mapper/ubuntu--vg-ubuntu--lv
It might not be a bad idea to double-check the math on the size to make sure it shrunk it enough: Take the number of blocks and multiply it by the block size.
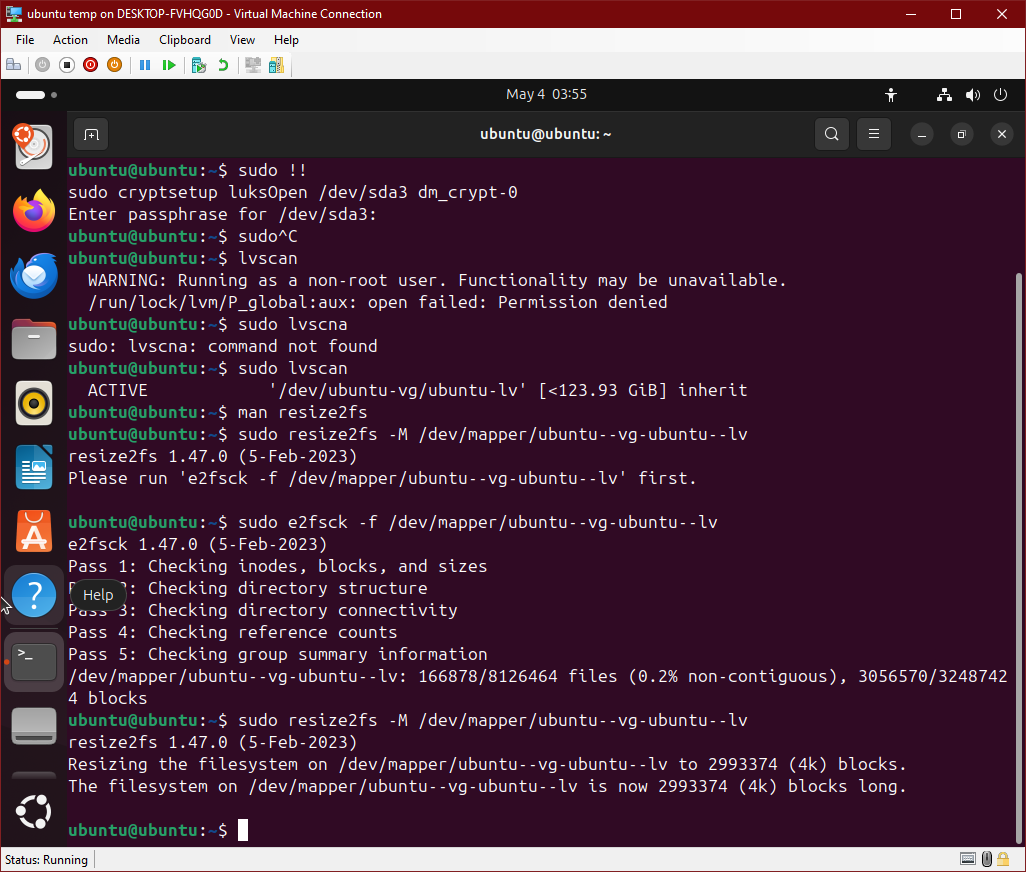
In this example, we’d do 2993374 * 4 / 1024 / 1024 to get about 11.4 GB, which sounds about right.
This just means that we can’t make the volume for / any smaller than that,
and we’re not going to make it nearly that small anyway.
Before we can resize the / volume, we need to decide how much swap we want.
For hibernate, we need at least as much swap as there is RAM, probably with a bit extra.
On my test system, I have 16 GB of RAM, so I’m going to go with 20 GB of swap.
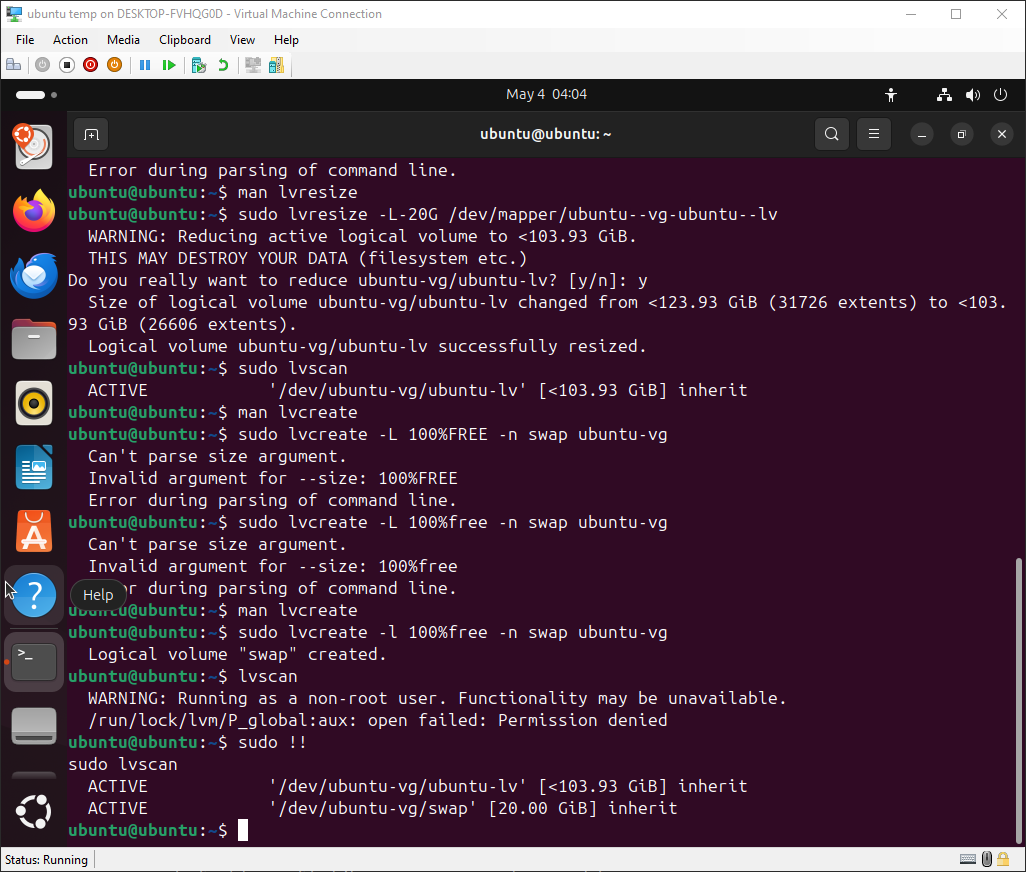
Let’s shrink the volume by 20 GB: sudo lvresize -L -20G /dev/mapper/ubuntu--vg-ubuntu--lv
It is going to be very angry that you’re shrinking a disk and wants you to be absolutely sure you’re correct. If you do screw this up, you’ll have to reinstall from scratch (and hopefully not actually lose anything since this is a fresh install).
We can finally create our swap volume (do note this has a small-L): sudo lvcreate -l 100%free -n swap ubuntu-vg
Checking sudo lvscan should show that we have two volumes now:
Lastly, we need to expand the / filesystem back to the full size of its volume:
sudo resize2fs /dev/mapper/ubuntu--vg-ubuntu--lv
Let’s mount it to make sure it shows the correct size: sudo mount /dev/mapper/ubuntu--vg-ubuntu--lv /mnt && df -h /mnt
That’s everything we need to do from outside the installed system, so reboot back into it and make sure everything is still working. We’re still not quite done, though: we aren’t using our new swap partition, so let’s fix that.
First, make it be swap: sudo mkswap /dev/mapper/ubuntu--vg-swap
Now edit /etc/fstab and change the line for /swap.img to /dev/mapper/ubuntu--vg-swap.
Finally, let’s turn off the old swap, delete it, and turn on the new swap:
sudo swapoff /swap.img && sudo swapon -a && sudo rm /swap.img
That’s step one, full disk encryption, done, and we’ve prepared almost everything we need for hibernate, too.
Hibernate
Now that we have a swap partition, we’re close to having hibernate work.
In fact, all we should have to do is regenerate the initramfs
so that it notices we have a swap partition on hibernate-resume boots:
sudo update-initramfs -u
At this point, hibernate should work, but your desktop environment might not expose it.
Let’s install pm-utils so we can check: sudo apt install pm-utils
Now, run pm-is-supported --hibernate; echo $?.
If it comes back 1, you’ve got something else getting in the way (make sure Secure Boot isn’t turned on!).
If it comes back 0, hibernate should work.
Run sudo systemctl hibernate and see if it does. The computer should save its state to disk and turn off.
Once it does turn off, turn it back on.
You’ll have to unlock the disk manually, but it should properly resume.
We’re already done with step 2! Now let’s get the TPM to help us unlock the disk.
Install Clevis
This is what took me the most time to figure out. I was really hoping to not need some additional software to make this work, but I was never able to do so.
Clevis glues everything together. It has support for a lot of different ways of decrypting the key that unlocks the disk, and we’re going to use it for its TPM support. You should also be able to make it require the TPM and a PIN you type at boot, if you want another layer of security, but I’m not going to explain how to do that.
We need to start by installing it: sudo apt install clevis clevis-initramfs clevis-tpm2
Assuming you want to use the same PCRs that I described above, it should be as simple as:
sudo clevis luks bind -d /dev/nvme0n1p3 tpm2 '{"pcr_bank": "sha256", "pcr_ids":"0,1,4,5,7,8,9"}'
Reboot. Depending on your chosen PCRs, it may either immediately boot automatically, or you may have to enter the password one last time and then run the script below to re-seal the TPM key again.
And… That’s it. The hard part is done. We have a few minor things left to do, though.
Hibernate in the UI
I use KDE. This section may or may not apply to other desktop environments.
For whatever reason, KDE on Ubuntu defaults to not showing hibernate as an option even if it works. We have to change some configuration, and then it should show up everywhere that suspend does (the launcher menu, the shutdown screen, power management action options, etc.).
Create (as root) a file named /etc/polkit-1/rules.d/10-enable-hibernate.rules with the following contents:
polkit.addRule(function(action, subject) {
    if (action.id == "org.freedesktop.login1.hibernate" ||
        action.id == "org.freedesktop.login1.hibernate-multiple-sessions" ||
        action.id == "org.freedesktop.upower.hibernate" ||
        action.id == "org.freedesktop.login1.handle-hibernate-key" ||
        action.id == "org.freedesktop.login1.hibernate-ignore-inhibit")
    {
        return polkit.Result.YES;
    }
});
This should have immediate effect. If not, try rebooting.
If it still doesn’t work, does sudo systemctl hibernate even work?
System updates
If you’re using the same PCRs that I’m using, kernel updates and anything that causes the initramfs to get regenerated are going to break the TPM. I have a simple script (below) that removes the TPM and re-adds it. Of course, this requires retyping the encryption key multiple times on every update, but I find the convenience of booting happening without the password (and especially hibernation resumption) are worth it. Of course, you’re free to use a different set of PCRs if you are ok with the tradeoff.
Note: If you’re using PCR 9, you must run this after rebooting and typing the disk password for one boot, as that depends on the state of the kernel image and initramfs as the currently-running kernel sees it.
#!/bin/sh

sudo clevis luks unbind -s 1 -d /dev/nvme0n1p3
sudo clevis luks bind -d /dev/nvme0n1p3 tpm2 '{"pcr_bank": "sha256", "pcr_ids":"0,1,4,5,7,8,9"}'
Testing TPM invalidation
If you’re using my PCR settings,
the easiest way to test if the TPM will properly not unlock the disk when something changes is to turn Secure Boot on.
Alternatively, sudo update-initramfs -u should also cause it to stop booting
(but to make it work again, you’ll have to run the script above).
What about Secure Boot?
If you do want to use Secure Boot temporarily for some reason, you should be able to just turn it on and it’ll work. If you’re using PCR 7, you’ll have to re-run the script to re-seal the TPM configuration, but afterward it should continue to unlock the disk. Obviously, hibernate won’t work. When you’re done with Secure Boot, you can just turn it back off, re-run the script again, and be on your way with hibernate again.
Closing
Do one final test of putting the laptop into hibernation from your desktop environment and then turning it back on. It should Just Work™!
Make sure you back up your LUKS header and store it somewhere safe!